Foreword
I've been converting maps for about 2 years now. Throughout this, I had a lot of help from Panzer(handschuh), who in turn had been converting maps for roughly 1½ years before me.
Without his help, the TF2 surf community would have been about 56 maps (that I converted) poorer. I hope this tutorial is as much help to you, as Panzer was to me.
I've been doing this as a free service to the community, never taking credit for the maps, nearly always kept the maps as close to the original as possible and I expect you to do the same.
Keep in mind the amount of work and imagination put into each map, by their creators, and respect this when reshaping their works.
Initial setup:
This tutorial assumes you have Hammer as well as Counter Strike: Source and have at the very least read
"Introduction to Editing" and followed the
"Your First Map" tutorial.
You have also set up Sourcemod and Metamod: Source, to allow for surfing on a listen server. Add these commands to the bottom of your sourcemod.cfg to ease testing:
http://pastebin.com/nWHeU0DUDownload
TF2 SDK Launcher.
Download
TF2 Ultimate Mapping Resource Pack.
Download
GCFscape.
Download
VTFedit.
Download
BSPSource.
Download
Pakrat.
Download
VBCT.
Download
PackBSP.
Use GCFscape to extract your Counter-Strike: Source textures/models/sounds (when extracting textures, go into the folder and make sure
NOT TO EXTRACT these two folders: console & vgui) to your Steam\steamapps\common\team fortress 2\tf folder.
Download Source SDK Base 2006 & 2007.
___________________________________________________________________________________________________________________________
Step 1. Download the map from
Gamebanana. If Gamebanana doesn't have it, do a Google search, you can find FTP servers by using this formula: surf_namehere.bsp OR surf_namehere.bz2 (bz2 seems to be more reliable)
Step 2. Extract textures, using pakrat.
Pakrat:
Before you do this, ensure your pakrat settings are the same as in this image:

Navigate to the folder where you placed your map and open it.
Extract custom textures and models to their appropriate folders. (You will have to create the folders with the same structure or they won't work. Take care to note which files are regular textures, skybox textures, models and textures for models.)
Generally, any textures with a folder name that isn't from CSS, is a custom texture apart from skybox textures which always go in the skybox folder. (On rare occasions, mappers will take existing textures and modify them, putting them in the same folder as the originals. You might not find out until you compile your map and see a missing texture.)
You will need both the .vmt and .vtf versions of textures for them to work (in some cases, you'll only find a .vmt texture. Extract anyway, it most likely references a differently named vtf file).
A texture with a name consisting of 3 segments of numbers, seperated with underscores, is a cubemap texture. Do NOT extract these, you will be building your own cubemaps later.
Step 3. Decompile the map using BSPSource
BSPSource:
Set up BSPSource according to this image:

Drag the .bsp onto the BSPSource window.
Click Decompile.
Get rid of the _d part of the name, and save to a location of your choice.
Close BSPSource once it has reached "[info] Processed 1 file(s) in #.#### seconds"
Step 4. Open the map in hammer, time to work.
Preliminary Work:
Re-save map without missing solids if you get this error. Try to identify which brushes have gone missing if possible. The TF2 engine hates spikes, so if you know of any spikes in the map, these might be the problem. At best, it'll be hard to find and in most cases this has no impact on the map (unless it's a ramp or obstacle).
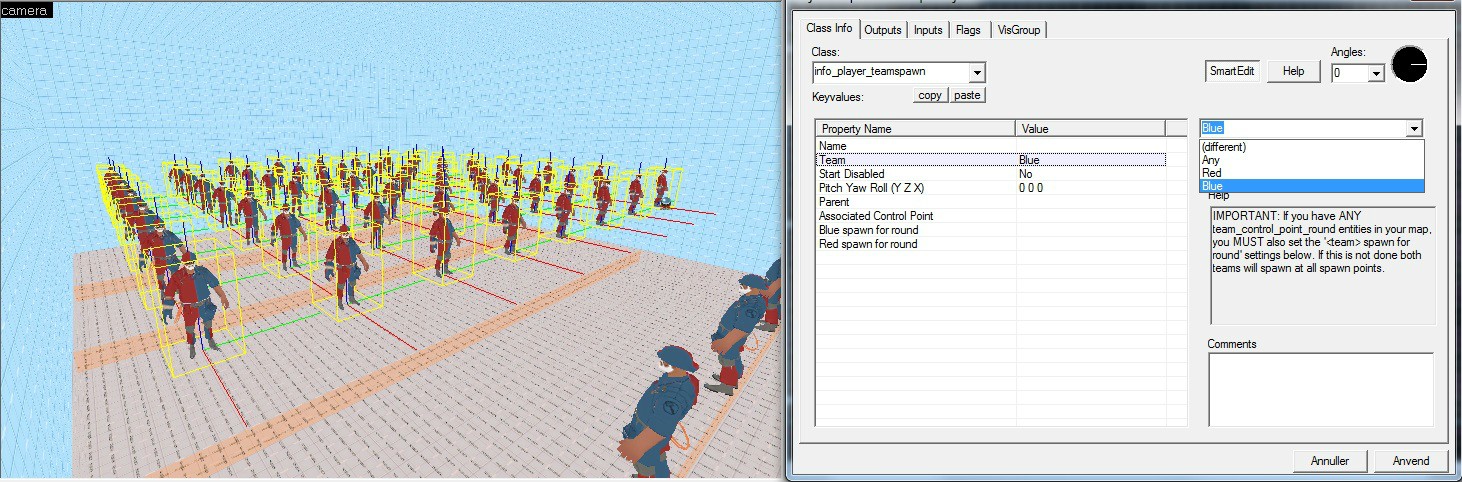
Change player spawns. These are called info_player_counterterrorist/terrorist and must be changed to info_player_teamspawn. A good practice is to select all of one kind (select them in entity report, click properties and change the class to info_player_teamspawn, then set [Team] to the corresponding names (terrorists = red, counterterrorists = blue) and changing them to the proper teams inside the entity options.
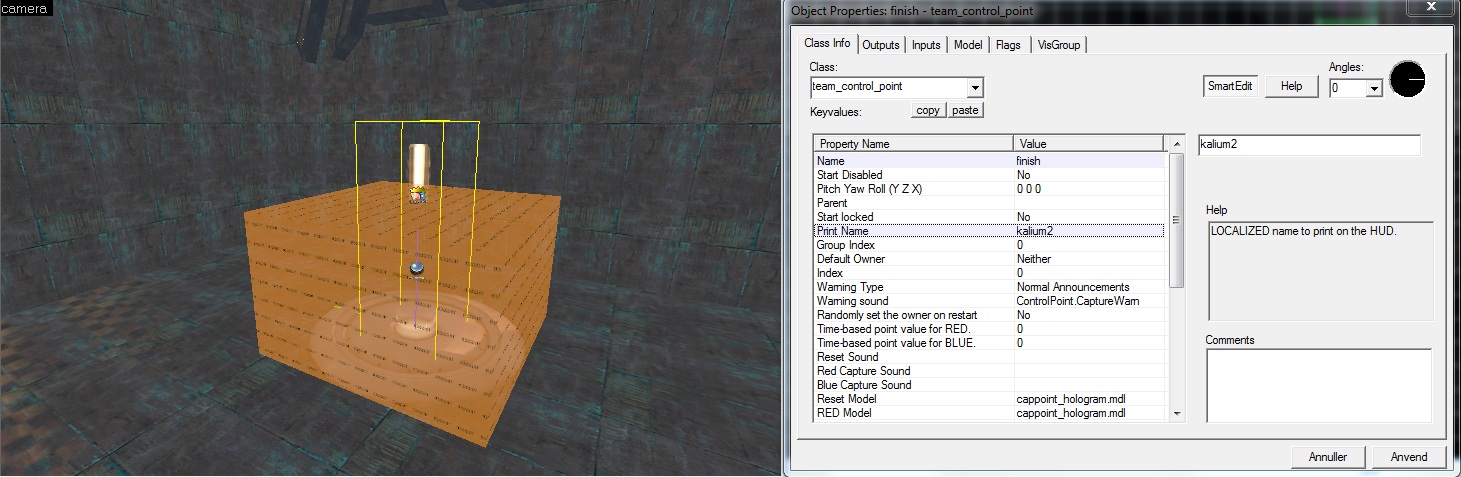
 Add a capture point
. This is necessary for a map completion plugin to register the player and display a message. Change the [print name] of the team_control_point entity, to the name of the map. There are some cases where the final area is too small to fit a capture point. In this case, either enlarge the area/surface (unless it adds extra difficulty or makes it too easy) or don't add the CP at all (exhaust all other options before doing this). I've provided a
prefab for this.
Add a func_respawnroom, with [Team] set to [Any]. In some cases, this entity is broken and you will need to create a duplicate of this, in the same spot, changing both to respectively be
Red and
BlueFind and delete any game_player_equip entities.
Making sure the map works:
Information on most map errors can be found at the
interlopers error listingClick on Map > Check for problems, or press Alt-P.
Most common surfmap errors and their solutions:
Entity [entity_name_here] has unused keyvalue "spawnflags". Simply highlight the error and press the [Fix all (of type)] button.
Entity keyvalue "filtername" refers to a missing target. This error can usually be ignored. It is caused by Hammers inability to find a target with the given name, because the target won't exist until a player touches a trigger that sets their targetname.
There is no player start. This error can safely be ignored and is caused by Hammer being created with singleplayer games in mind (HL2), which would require such an entity for the player to spawn.
Some models that can break into pieces in CSS will become invisible in TF2. To fix this, turn the entities into prop_dynamic_override entities. Note that this will make them static objects, which the player cannot move in-game.
Errors that will not show up inside the error finder:
Getting stuck in teleport destinations. There is quite a size difference between CSS and TF2, often leading to players getting stuck inside playerclips and brushes. Move the destinations 16 units away from any solid brushes/playerclips or resize them to fix this.
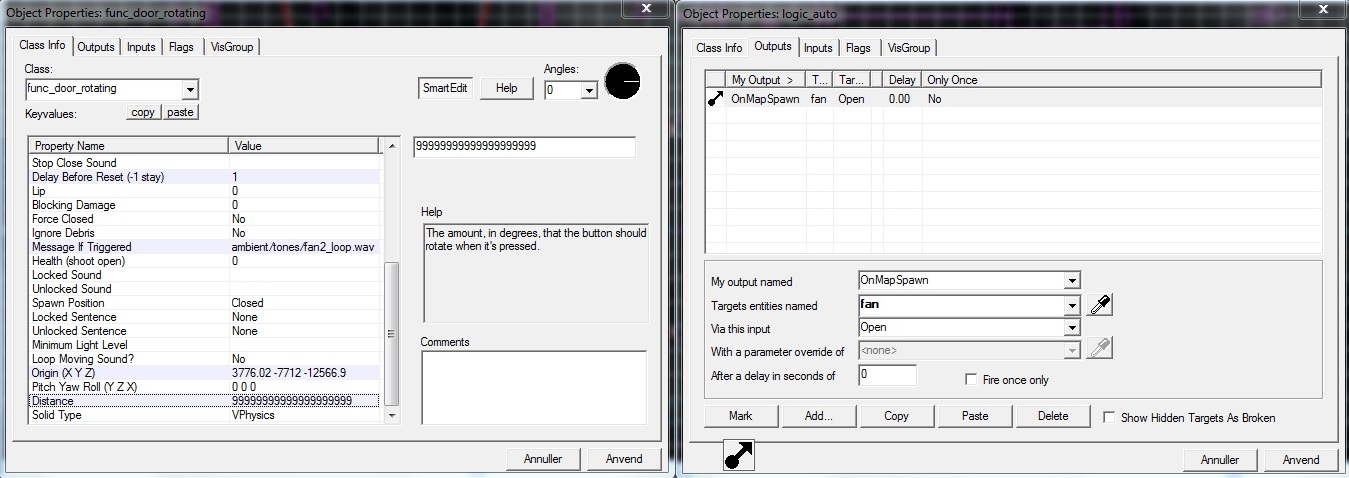
Func_rotating is a defunct entity in TF2. To fix this, you have a couple of options. First one (I use this one) is to turn the entity into a func_door_rotating, change [Name] to "Fan", change [Speed] to the value that [Max Rotation Speed] on the func_rotating was at, setting [Distance] to a large number such as 99999999999999999999 to ensure it keeps rotating for as long as possible (make sure to set the flag [Door Silent] to [On]), then adding the following output(s) to a logic_auto (create one if necessary).
Alternatively, you can use this or the other method linked to in
this thread.
Point_viewcontrol does not work as intended in TF2. To fix this simply change the entity to a info_observer_point and change "Welcome Point" to [Yes]. (This may reset the entity rotation, in which case you'll need to re-arrange it. Make sure to take note of what the camera is looking at before changing the entity.)
Boosters from flat ground. The ground friction in TF2 is quite a bit higher than in CSS, making these break when converting it. I've provided a
prefab, which you can toy with in order to make it work as closely to the CSS version as you can.
Sometimes you'll encounter textures with the same names in both CSS and TF2. When converted, the TF2 texture will take precedence. To correct this from happening, you'll have to find the CSS texture and make a copy of the .vmt and .vtf files. Then simply add a _css to the end of the names (be sure to do the same inside the .vmf). Now you can find the texture in your map (remember to restart Hammer for the textures to update), click the [Replace...] button, find your _css version of the texture and add it to the replace box, have the [Replace exact matches] option ticked and press [OK]. (This can be hard to spot if you're not familiar with the textures. Noclip through the map in CSS and take note of the textures for comparison.)
Displacements can sometimes cause a map to crash on load. If this happens, locate any displacements in the map with a power of 4 and scale them down to a power of 3.
Now that you've (hopefully) fixed the bugs, it's time to compile the map and test it out.
Step 5. Compile the map for the first time.
Early Compiling:
To ensure that you can find bugs as fast as possible, you'll be compiling the map with these options:
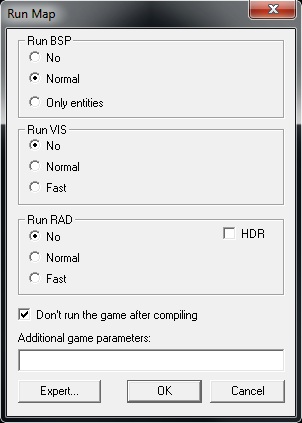
This creates a fullbright version of the map (with invisible water, if water plays a part in the surf, compile with VIS on [Fast] instead)
Now open TF2 and type "map surf_mapnamehere" in your console to play it on a listen server.
Step 6. Test the map for errors.
Testing:
The more experience you have with this, the easier it gets.
There are at least 3 things you need to check:
Surf the map and be able to complete it. Do this at least 5 times, trying different routes. This ensures that you won't miss any glaring problems.
Missing models. This is pretty self-explanatory.
Textures that are wrong, be it missing textures, cubemap reflections or something entirely else.
Step 7. Optimize for final compile. (OPTIONAL but highly recommended to cut down on compile time and increase framerate)
Optimizing:
Throughout my years of converting maps, I've always strived to keep a high level of quality.
This means optimizing the map to make sure everyone can play it at an acceptable framerate.
There are many methods of optimizing maps, ranging from simple func_detailing to occlusion. If this interests you, there is a quite comprehensive guide located
here.
Surf maps are generally quite simple in terms of visuals and a large part of them consist of little more than large bare walls.
Therefore your foremost task is using the func_detail and func_viscluster brush entities, in order to cut down on compile time
func_detail will convert a brush into an entity which does not divide visleaves.
In order to find brushes that divide visleaves unnecessarily, we will need to compile the map with VIS on [Fast].
Now we can load the Portal File. This is found in your top menu under [Map] > [Load Portal File].
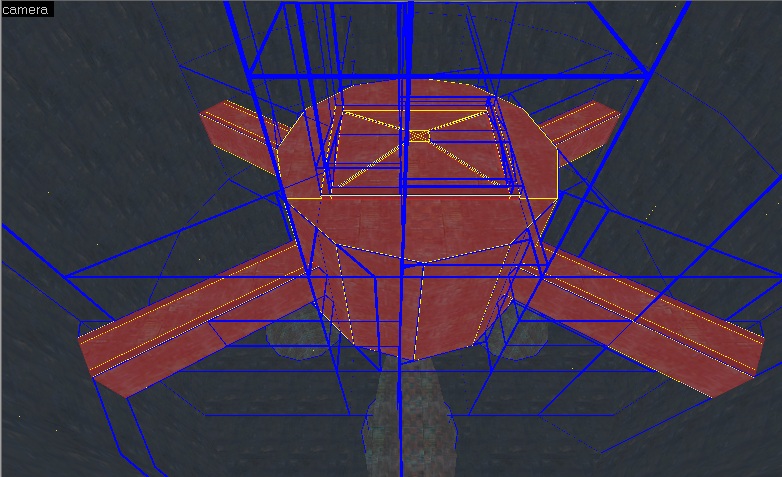
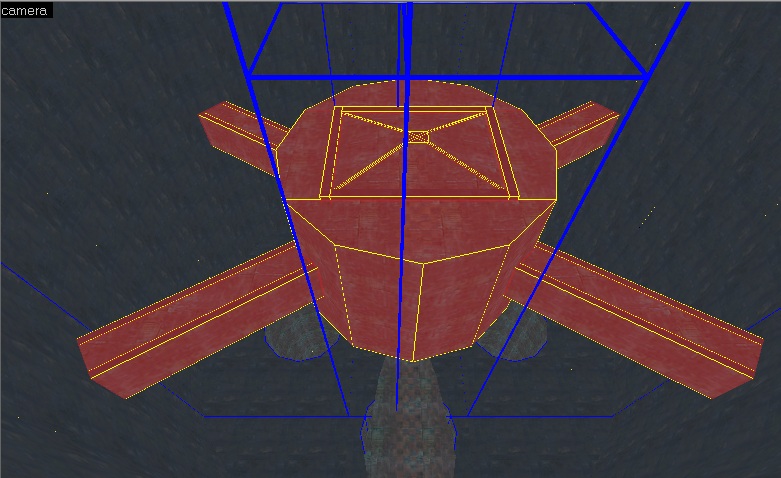
With this loaded, we can now see the visleaves. Fly through the map in your 3D viewport, looking for anything that splits a large amount of visleaves, highlight it and turn it into a func_detail (hotkey: ctrl-t).
When you're done, do another fast compile. Quite often you will get
leaks at this part, because func_detail does not seal leaks. Fix this by turning the func_detail back into a solid brush.
Also of note is the func_illusionary brush entity, which does the same with the added bonus of making the brushes non-solid. Use with care.
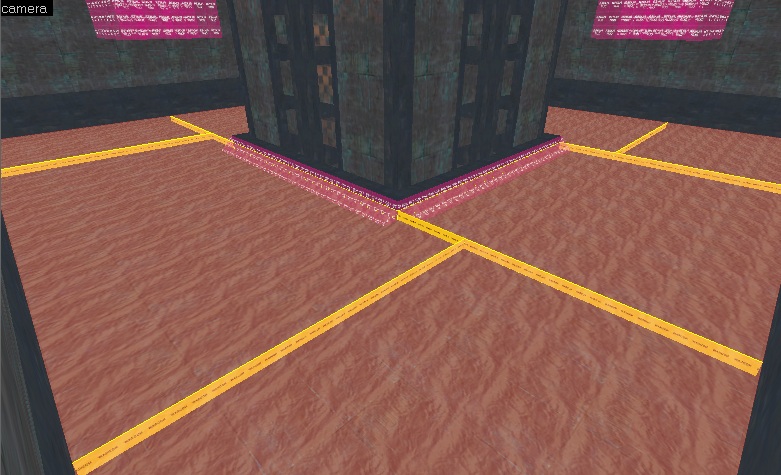
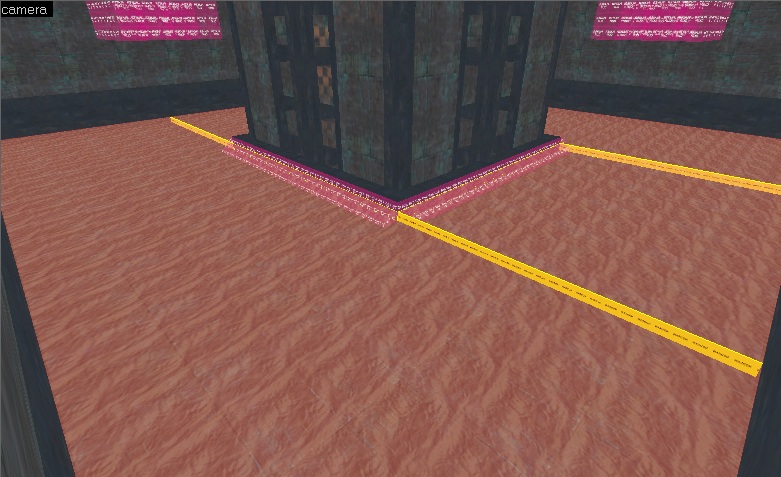
Before:
After:
 func_viscluster
 is a brush based entity which will tell the engine not to split visleaves inside of it. This is handy for large open rooms, in which VVIS will create a high number of areaportals, which increases your final compile time considerably.
This won't be necessary on all maps, but many of the linear surf maps will take a very long time to compile.
Here is a tutorial on how and where to add this.
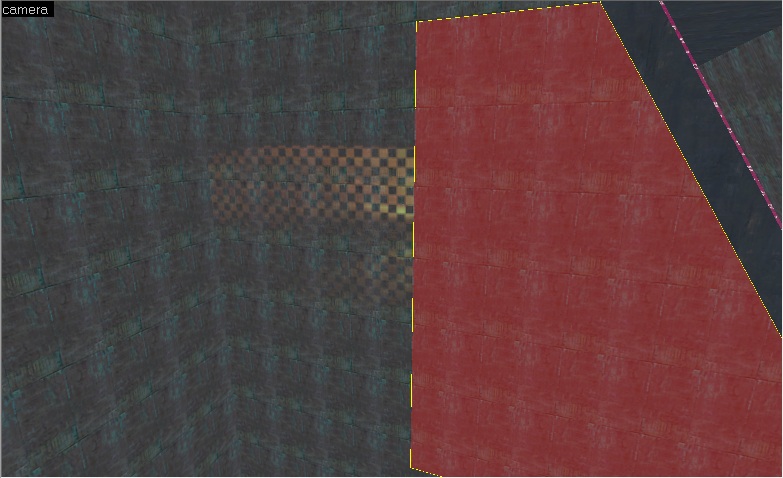
Brush optimizing is basically reducing geometry. Most of the time, you'll just be fixing extra brushes created as a result of bad clipping. Below are a few examples:
This will most likely require you to learn about the
vertex tool.
The goal is to reduce brush-sides without creating invalid brushes.
Some brushes are too small to align to grid. Ignore these, just ensure they are func_detail/illusionary.
Example:
 Step 7½
 (OPTIONAL). Align textures in the map. This is quite a time-waster and unless you enjoy improving the aesthetics of the map, don't bother with this.
Texture-alignment:
Bad texture alignment can break immersion as well as cause overlapping textures which flicker (this is known as
z-fighting) as well as bad cubemap reflections
.
To fix this, use the texture tool to fix the textures so they are aligned. This can be done by highlighting a texture and right-clicking on the adjacent brush. If you are so inclined, you can make surfaces that are not connected by straight planes look far better, by holding down the left ALT key, then right-clicking. Experiment with this to get a feel for how it works
Hammer Face Edit
Step 8. Compile a version to be tested by other surfers.
Packing textures/models:
The aim of this, is to get inputs on your convert from outside sources.
This is often a great way to discover missing textures, as the testers will not have the same textures and models as you do.
To compile a suitable version for testing, compile the map with RAD and VIS on [Fast].
Now grab the map from your maps folder and transfer it to your PackBSP folder.
Open PackBSP.
Browse to and select, your Steam folder (c:\program files (x86)\steam) then click [Next].
Close the logging window and select [Team Fortress 2] from the [Game] dropdown list and click [Next].
Browse to your map and select it, then click [Next].
Click [Run Dependencies] then [Next] when it's done crawling the map file.
Ensure that the correct textures/models are being added to the map and click [Next]. You can add these using the [Add New...] button later, if your testers spot missing textures/models.
Save over the map and you're done.
Now you can upload your map and link it to your potential testers.
Repeat this procedure as testers find problems, until none can be found.
Step 9. Compile the final version to be uploaded to a server.
Final compile:
So you think the map is in a functional state and your testers are happy with the result?
Then it's time to bring out the big boy of compiling, VBCT.
This program has a special setting that will slightly increase your compile time, but produce better lighting and shadows.
Open the map with VBCT and click the [Final] button.
Now you open the map in TF2 and build the cubemaps. There is a guide on how to do this, located
here. Follow the LDR process unless the map has HDR in CSS.
When you're done with cubemaps, close TF2 and repeat the texture/model packing process, upload and share with your favorite server administrator, who will happily upload the map for you.
Step 10. Enjoy the massive respect and gratitude that comes with doing all this work (this step is optional and unlikely to happen, because this is the internet and we've all seen better)
___________________________________________________________________________________________________________________________
Tips and tricks:
Entity properties window can be opened by double-clicking or alt-enter.
Entity report is a great tool for locating entities. If you're looking for the teleporter destination for say, level 2, and you know the destination for level 1 is called destination_1, you can tick the "By key/value:" box and type "destination_2" in the right-most box underneath.
If you encounter a problematic texture, such as a translucent texture creating leaks hidden between brushes, then you can use the [Replace All] function to highlight every brush with that texture, by ticking the [Do not replace textures (mark found solids)] box.