Forums

Show Posts

This section allows you to view all posts made by this member. Note that you can only see posts made in areas you currently have access to.


Topics - Drexen

Pages: 1 [2] 3
16
Mapping Tutorials / Jump Mapping - 3 - Playing your map
« on: October 26, 2011, 11:57:12 AM »
1 - Adding a spawn point

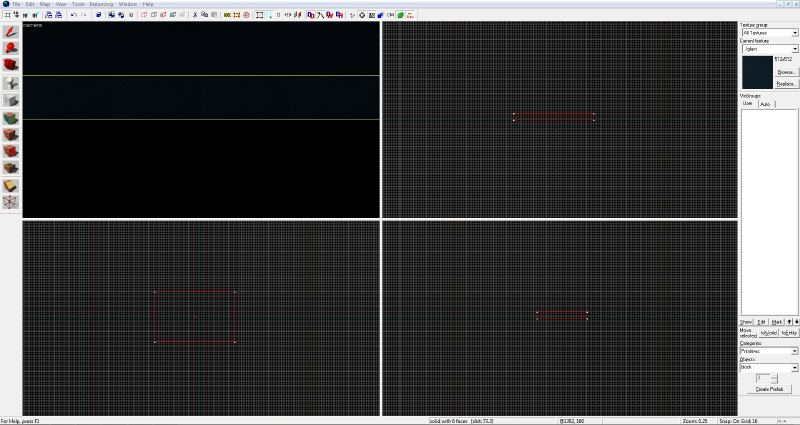
For this tutorial, I've gone ahead and made a small room. If you want to see what your map will look like in tf2, first of all remember that your map wont load if there is a space in the name. Use _ as a substitute for a space.

To mark where you will spawn in your map, you need an entity called an info_player_teamspawn. If you are confused about what an entity is, it can range from a light, to a prop, to a button. They allow you to script stuff to happen in game.

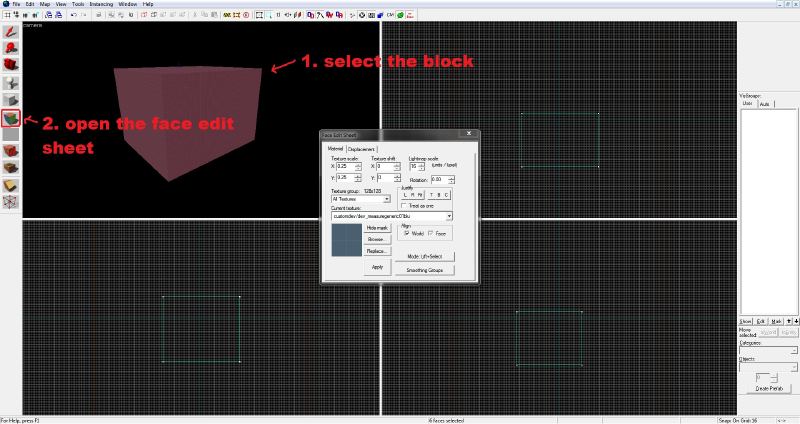
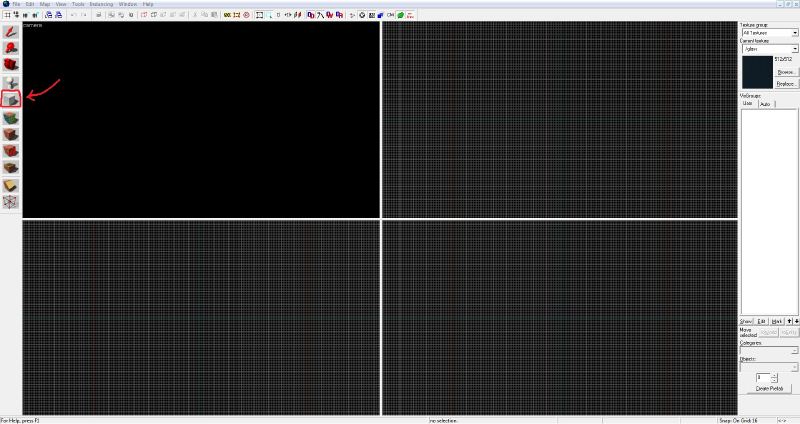
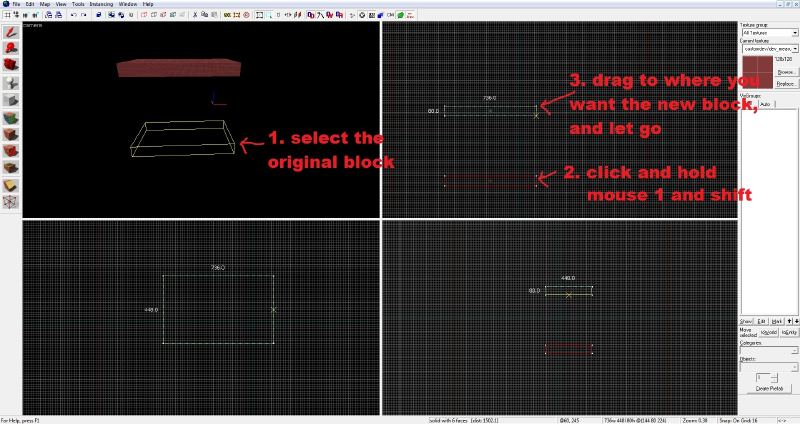
First of all you must create an entity. To make one, simply select it from the left side menu, and click on the floor in the 3d view.


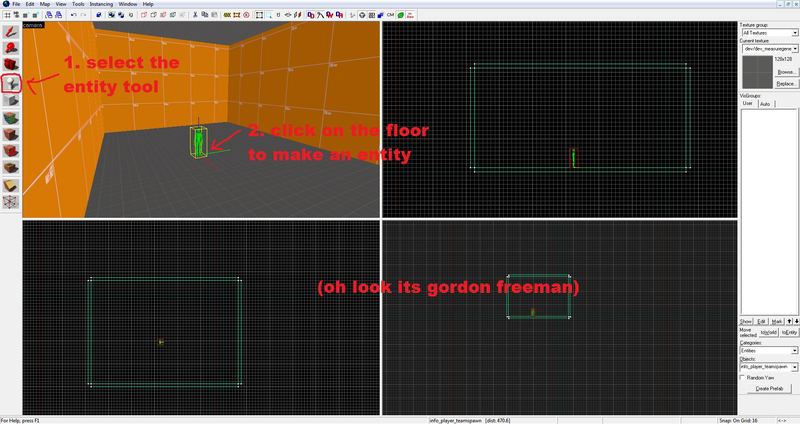
As default you should see a little green man (p.s. its a green gordon freeman). If not, it doesn't matter. With the object you've made selected, press ALT and ENTER together to bring up its properties. Here you should see another window. What you want to do is turn this thing into a spawn point, do so by setting class to info_player_teamspawn.


One thing to note, make sure to press apply a few times to make sure it actually sets it to the correct entity. Now your entity should look the same as mine.

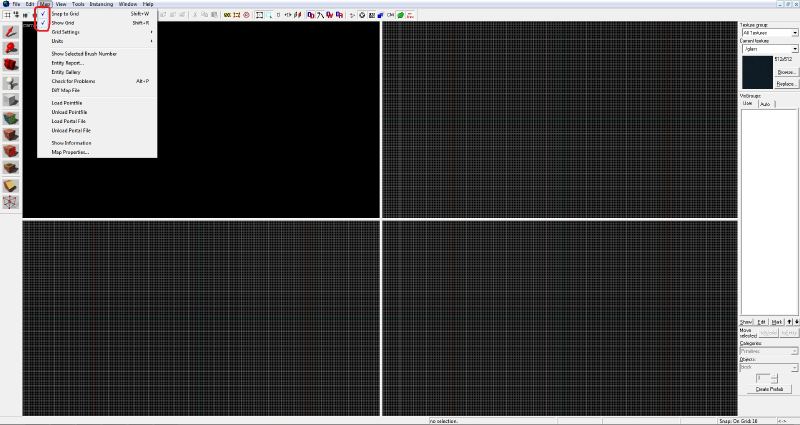
Something else to note, there's a slight bug with hammer, so your spawn point should be a few units off the ground. I've gone and set the grid down to 4 units per square and moved the entity so his feet are 4 units off the ground:


Make sure to set the grid back to 16 units! A word of advice is to have about 16 of these spawn points so everyone doesn't overlap when they spawn.

2 - Compiling your map

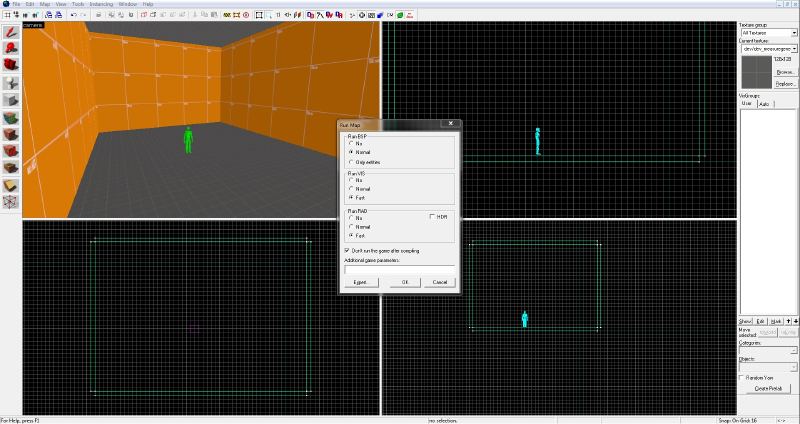
To compile your map is to basically convert your map from a hammer format (.vmf) to a format which tf2 can run (.bsp). To compile your map, press F9 (make sure its saved first with a name with no spaces).

Some things to note here. BSP should always be at normal (no exceptions). VIS can be set to fast if you want a faster compile time when testing, but for a final release you should typically use normal. This is the same for RAD. HDR should be unchecked, since its not required. One other thing, typically you should check the 'Don't run the game after compiling'. Don't be lazy, go open tf2 yourself! So now go and hit OK.


Once you hit OK, prepare for some epic lag, (just leave your PC until it's done). Compile times can very dramatically. Poorly built maps can fail when compiling, and some unoptimized maps can take hours and hours to compile. For a small dev map it should only take a few seconds. One thing to note: I'm going to use jump_volcanic as an example here since it's a colossally large map. VIS only takes 1 second, so if it's taking longer, then you're doing something wrong. RAD on the other hand takes ages. I'll explain at the bottom of this tutorial what these things are actually doing if you are interested.

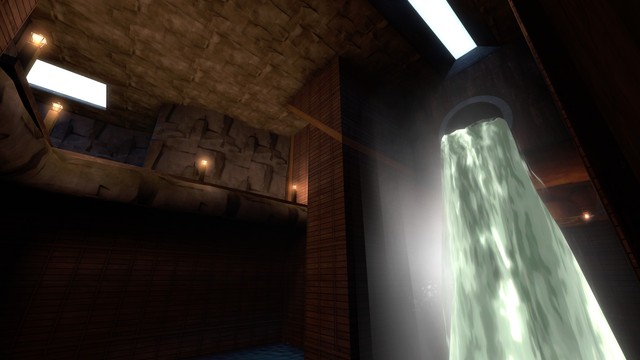
You know when the compile has been completed because it says 'Copy to clipboard' at the bottom of the compile log. (or if it crashes...) Now you can load up tf2, type map (mapname) into the console, and marvel at your first tf2 map!


Some technical stuff, if you're interested.

BSP (Binary space partitioning)

This step of the compile calculates all geometry and entities positions and w/e. Kinda boring but you always need this.

VIS (Visible info sets) - or something like that

This process calculated vis leafs. A vis leaf is a section of map, the size of each vis leaf is calculated by the position of geometry in your map. The reason this can take ages for some maps is because there is way too much geometry or if you use loads of tiny pieces and they are all off the grid and messy. So like I said, volcanic only took 1 second to compile VIS, so it was very optimized.

RAD (Radiosity simulator)

Radiosity basically means lighting. This step of the compile calculated lighting, light bounce, texture lightmaps etc... This can take a long time as your map becomes larger, and as you add more lights into your map. HDR, or high dynamic range, will cause RAD to run twice, calculating light bloom and other stuff that HDR uses to make more experienced peoples maps more pretty (and more realistic). HDR will also cause your map to be about twice as big.

17
Mapping Tutorials / Jump Mapping - 2 - Texturing Basics
« on: October 26, 2011, 11:52:39 AM »
1. Applying a texture to a whole block

To apply a texture to a block (every face of a block) first of all select the block, then open the face edit sheet as shown:


This window gives you lots of information, but a lot of it isn't needed for basic dev textured maps. To change the texture of the block, click browse to bring up a window of all the textures available to you (all of the hl2 ones will also be there if you have it installed). Next (since I'm going to be using dev textures, type 'dev/' in the filter:


In this example, I'm going to be using the dev/dev_measuregeneric01 texture, so go ahead and double click it.

Now with the texture you want shown, click Apply and close the face edit sheet.


2. Applying a texture to a face

To apply a texture to a single face of a block, first of all without the block selected, open the face edit sheet, click browse, and double click the texture you want. Now the texture you want to apply should be shown on the face edit sheet. To apply this texture to a face of a block, simply right click on the required face.


Remember, there is no need to press apply. With the selected texture on the required face, you can go and close the face edit sheet.

One other thing to remember, if you want to apply a texture to multiple blocks, select the blocks by holding CTRL then follow the steps to apply it to a whole block.

18
Mapping Tutorials / Jump Mapping - 1 - Block basics
« on: October 26, 2011, 11:47:10 AM »
1. Creating blocks (geometry)

So, i've gone ahead and loaded up a new map. Creating geometry in hammer is very simple. All you need to do is select the block tool on the left hand side of the screen in the main toolbar as shown:


Now with that selected, in either of the 2d views (I'm going to use the top-down view (bottom left one if you've set them up as I have) to make floor) click and drag to make an outline of a rectangle.


Then go and hit enter, and it'll create the block there. Easy eh?


Heres an important thing. Just after creating a block, you have to press ESC to bring up the block handles. These allow you change the size of the block and also if you click and drag in the centre of the block you can move it about.


Pressing ESC again will deselect the block.

Things that can go wrong:

1. When I click and drag to make a block (or in some cases when I press enter to create it) the outline just disappears.

This is because you have the selection tool selected rather than the block tool.

2. When I press ESC or when I select the block I get some weird handles showing as shown:


With the block selected, if you click in the centre of it, it will toggle between different handles. In the image shown, the left one will allow you to rotate the block and the right one will allow you to move block edges. So to get back to the normal handles just click in the centre of the block until you get the familiar handles. Also, if you do end up wanting to rotate or move object edges around, there are other better ways of doing it which I will explain later (so don't use them).

2. Object selection and view navigation

I'm going to start by explaining how to move about in the 3d view. Theres 2 main ways to move the camera in the 3d view. You can either use WASD to fly around and the arrow keys to move the camera, or you can press z with the mouse over the 3d view and use the mouse to move the camera (also using WASD to fly around). I use to use the first method, but recently i've changed to using the mouse because it's much easier.

Also, the crosshair will change to this sign when you press z:


One other thing I should mention is how to move in the 2d views. Use the mousewheel to zoom in and out, and also you can use the arrow keys to move the grid in any direction.

Second thing. Now that you've created a block (or many), the easiest way to select them is by moving around in the 3d view until you see it, then just click to select it. Also remember that pressing ESC will deselect it.

If you want to select multiple objects, hold CTRL while selecting them.


An alternative way is to select the object selection tool in the main toolbar and click and drag.


Note that if you use the object handles to scale or move objects with multiple objects selected it will move them all, or scale them all.

3. Copying blocks

Another easy way to make blocks quickly is to copy blocks. To copy a block, select it in the 3d view then click and hold mouse 1 and also click and hold SHIFT, then drag the new block to where you need it, and let go of SHIFT and mouse1:


Simple stuff, one of the most useful tools in mapping (or in fast mapping anyway).

4. Scaling

Scaling does mainly take practice to get used to, but of course you can never be perfect in hammer so the only way to perfect the distances in your jumps is to test them. Here is a list of some scales that might be useful to you (also don't complain to me that you can jump further than these distances, some are from valve and others are just guesses from me).

From valve:

Model          Height       Width
Player (standing)    83       49
Player (ducking)    63       49

Jump distances


From me:

Good height for a soldier to start a rhop - 64
Good height for demo to start pogo - 192

Those pogo heights are kinda just guessing, but they look alright to me in hammer.


19
Mapping Tutorials / Jump Mapping - Setting up hammer
« on: October 26, 2011, 11:35:45 AM »
1. Installation


So first of all, pretty obvious, but go and install Source SDK from the tools tab. Run it, and it'll do something about verifying files, one thats all done, set engine version to Source Engine MP, and set current game to Team Fortress 2. Now go ahead and open the hammer editor.


2. Autosaving

Second thing to do that always comes in handy is setting up an autosave feature. Click on tools > options then click on the general tab. Here you can enable autosave and other options that are useful. Alternatively you can disable it, but its saved many hours of work for me.


3. Making the 3d view look pretty

In tools > options, go along to the 3d views tab and set it up as shown in this image:


4. Setting up viewports

First of all, make a new map (file > new). Here you want to set up which views are where. Follow the steps in the image to set them up properly.


5. The grid (most important thing!)

As I nag on and on to everyone, neatness is key! So an easy way to make your maps neat is to use a suitable grid side (and turn it on...)

To make sure the grid is turned on, and objects will snap to the grid make sure these options are selected in the map toolbar:


Next thing to do is to set the grid to a suitable size. I always use a grid size of 16, so all walls/floors/ceilings will be a minimum of 16 units thick. You can see what size the grid is set to by looking in the bottom right hand side of the hammer screen.


To change the grid size, the hotkeys are [ and ]. (The square bracket keys). Alternatively you can use map > grid settings > smaller/bigger. Have a go at changing the grid size, and make sure when you're done they are set to a size of 16.


and there you have it. Everything should be setup to start mapping


20
General Discussion / discussion time
« on: October 24, 2011, 04:37:13 PM »
I was wondering, (and not for the first time) why not many people jump map. As much as i have thought about this i can't decide why. So tell me, is it because you dont have time? Is it because you think it'll be too difficult? Is it because you have no idea where to start and don't think you'll get manage?

Also to those who do do a bit of mapping, take the soldier mapping contest for example. how come you stopped? did you get bored of it because you just find mapping completely boring? or again, do you not have enough time? or you dont have any jump ideas, or that you think all jumps have been done a thousand times?

To those who havent mapped before. whats stopping you from trying it? if you dont know where to start, idk maybe you want me to make some tutorials, or you can just ask someone who does map (i'd always find time to help). or if mapping just not appealing to you, i don't blame you.

And to those who do map... how come your not making a map now? out of ideas, i don't blame you. dont have enough time? also, not much you can do about that (apart from maybe asking me to help you speed up, or anyone else who does map, maybe you can learn a trick or two. sexydev for example only took me about 10-20 hours total, it really doesnt take long)


so yeah, i guess thats my rant over (if it was a rant). what im trying to say is mapping is easy (seriously, you can easily make a jump map without even needing to go near any technical stuff) and if you dont know where to begin, ask me or anyone else who does map, or maybe you want some tutorials or w/e.

21
New Maps / annex v2
« on: October 22, 2011, 12:03:08 PM »
just spent some time fixing some stuff thats been annoying me (and probably other people). not much different, just fixes

http://www.mediafire.com/?b5atyf9l5947f1n

have fun

22
ChiLL0uT Z0nE / drex's music v2
« on: October 15, 2011, 04:44:09 PM »
my music, since everyone else has put theirs here  :P

DJ Shadow - Building Steam with a Grain of Salt

DJ Shadow - Building Steam with a Grain of Salt Small | Large


zombie nation - kernkraft 400

Kernkraft 400 - Zombie Nation Small | Large


dj jean - the launch

DJ Jean - The Launch Small | Large


ATB - 9pm till i come

ATB 9pm till i come! HQ Small | Large


dj tiesto - traffic

Tiësto - T
raffic
Small | Large


DJ Krush - Beyond Raging Waves

DJ Krush - Beyond Raging Waves

23
ChiLL0uT Z0nE / drex's music
« on: October 15, 2011, 10:16:19 AM »
stupid me setup poll wrong... vote on v2

24
New Maps / Aperture Science - Spherical Testing
« on: September 09, 2011, 03:35:15 PM »
Something a little different, started messing around with the portal 2 authoring tools and started creating a new puzzle type game. (still an early version)

Aperture Science - Spherical Testing

25
Minecraft iT [RETIRED] / (sad face)
« on: September 04, 2011, 01:56:15 PM »
decided to make myself some minecraft art (a hl2 logo), and noticed theres a (quite a low) limit to how high you can build:

http://img716.imageshack.us/img716/2836/drexhl2logominecraft.jpg


anyone know if you can change the map height?

26
Mapping Tutorials / Jump Volcanic VMF
« on: July 25, 2011, 11:45:22 AM »
If anybody wants to look at jump volcanic in hammer, here it is, along with all the custom content I used.

Download link: http://www.mediafire.com/?hc3mya1yh5dvj2s


Also, for anybody who gets confused by it at first in hammer, try unchecking these visgroups:

http://img692.imageshack.us/img692/1557/volcanicvisgroups1.jpg

http://img171.imageshack.us/img171/3191/volcanicvisgroups2.jpg


(p.s. you may experience immense lag when viewing this map)

27
New Maps / Jump Volcanic - Final
« on: July 23, 2011, 02:09:36 PM »
So yeah... its finaly done.

Theres now 19 jumps with an additional 4 hidden bonus jumps for demoman, see if you can find them. Lots of fixes to the original 19 jumps, polish of detailing, additional bonus jumps, minigames, tweaked lighting and overall improvement is what you can expect in the final version of jump volcanic.

Thanks to bob +M|M+ for making the normal jumps, Mr. Happy for doing some detailing and everybody who has helped test the map.

Download link: http://www.mediafire.com/?5stxr75x76r3xnp

and heres some images:


28
General Discussion / Drexen's little problem...
« on: April 29, 2011, 07:32:45 AM »
If anyone can figure out how to remove the outline around my intel, then i'll add loads of secrets and what ever to jump volcanic, if not then no secrets!


bigger image here > http://img849.imageshack.us/img849/2879/jumpvolcanic0000.jpg


29
Jump Videos / Jump Volcanic Beta Run
« on: April 24, 2011, 05:14:23 PM »
Jump Volcanic Beta - By Drexen

30
Mapping Tutorials / Learn to map
« on: April 17, 2011, 04:11:04 PM »
So, since a lot of people have shown intrest...

Want to learn to map? Want to improve your mapping already? Then just add me on steam and I can help with any mapping problems you have or teach you everything you need to know about hammer.

Hopefuly we can get some new jump maps out there...

Pages: 1 [2] 3
spirit Powered by SMF 2.0 RC5 | SMF © 2006–2011, Simple Machines LLC